A power / traction kite tutorial. Learn to fly!
By Angus Campbell, Coastal Wind Sports
Contents & Links...
Safety
Like any sport, power/ traction kiting can be very dangerous and even lethal if certain basic precautions are not taken. The advice we give you here is general in nature. We cannot be with you to monitor conditions, equipment suitability and pilot skill levels, so that is completely up to you. Even when we do meet our friends and customers on the beach, the pilot holds the ultimate responsibility for their safety and the safety of those around them. Here are some important tips...
Some of these suggestions overlap with other topics in this article and will be repeated, but I think the reinforcement is useful.
Choose the Day
For your first flight, make sure that the wind is not too strong for your size kite. For 2.5 to 3.5 square meter kites, the perfect breeze for your first flight will be around 8 to 12 mph and pretty steady. 3.0 to 4.0 meter kites will do well in 7 to about 10 or 11 mph without being overpowered for a novice. Smaller foils can take a little more without getting you in trouble and will likely need at least 8 mph to even fly reliably and 10-15 mph being optimal. These ranges will vary for your body weight, specific kite design and other factors, but are a good place to start.
If you fly your foil in too strong a wind for its size the first few times out, you will have a hard time, you will not have fun and you could easily get hurt and damage the kite. Kiters have even been killed by flying large kites in conditions outside of their skill levels. A smaller kite will never become dull for you or outlive it's usefulness; it will just become your 'high winds' kite as your skills improve and your kite stable grows.
A useful way to gage and describe wind speed is with the Beaufort Wind Scale. It was developed in 1805 by British Rear-Admiral Sir Francis Beaufort as a standard for estimating wind speed, not with instrumentation, but by using your own senses and observing the wind's effects on your surroundings. The scale is still used today by mariners and more recently bt kite fliers. Most kite manufacturers use the Beaufort Scale to list the suitable wind ranges for their products.
With the Beaufort Scale, our perfect learning conditions of 8-12 mph is easily described as Bft. 3, or just "force 3". Once comfortable there, you'll be able to enjoy the sweet spot of flying conditions in about Bft. 4, (about 12-18 mph). Aggressive power kiters like to put their gear to work in force 5 (19-24 mph), or maybe more, but you better have the right equipment and experience.
Things You'll Need
Here is a checklist of things you will want to bring along besides your kite, handles and lines:
Choose the Site
If you are heading to the beach, think about going online or look in the newspaper to check the tide tables for low tide times. On many beaches, low tide is the only time there is enough room to avoid other people or dunes and vegetation. Also learn to check the wind direction. It won't matter as much while you learn (as long as you have room), but if you want to work towards kite buggying or kite-boarding, you will want to look for an on-shore breeze roughly 90 degrees to the beach.
When you get to your site, think about where you are going to stand and take into consideration the lengths of your lines. Stand with your back to the wind and visualize a semi-circle with a radius the length of your lines and extending from off your left shoulder around to your right. Make sure that the area is clear of obstacles that could snag and rip the kite, and clear of where bystanders could walk by. Kites are soft and not heavy, but when flying fast they can pack a wallop and really hurt someone. And worse, kite lines under tension can cut to the bone!
Setting Up
When you figure out where you are going to stand and fly from, lay your stake on the ground as a marker. You won't need it stuck into the ground until you land the kite, so leave it loose so you do not trip over it or worse, fall onto it. Now take your kite, lines, handles and weights and walk down wind a distance a little more than the lengths of your lines. The first time out, you will have to guess the distance, but you will soon learn to count the paces for your stride and be within a foot or two of your line length. Thirty four paces works for me with a 25 meter line set.
With your back to the wind, un-fold the kite on the ground with the trailing edge nearest you and the leading edge with the air inlets farthest away (downwind). As you unfold the kite, use the weights to hold down the trailing edge of the kite and keep the kite from blowing away. If you are alone with no helper, then they are an absolute must. There is a different way to set up the kite for launching in higher winds, but we are assuming that for your first flight you have chosen light to moderate winds and will cover the other methods in the next article.
If you are on the beach, you can use sand in lieu of weights by scooping it over the trailing edge of the kite. A handy way to do this is to use your heel to dig a trench as long as the kite span and an inch or two deep, perpendicular to the wind. Then starting at the center of the trench, unfold your kite from the center to a wing tip and place the trailing edge in the trench as you go, covering it with the loose sand you kicked up. Then go back to the center and do the other half. If the beach has fine sand that just blows all over the place, move closer to the high-tide mark or even closer to the water until you find moist sand that clumps and stays in place instead of blowing away. You don't need to pile a lot of sand on the kite; use just enough to cover the trailing edge to keep the wind from getting under it. The kite will stay in palce while you finish setting up and the sand will fall off when you launch. If you can't use sand, don't use rocks or anything else that is abrasive to the fabric, and be sure that whatever your use cannot snag a bridle line. We've even used old in-line skating wheels, since they are soft enough and round so they roll off on launch without snagging. Common plastic drinking water bottles (filled) are good for this reason, too.
Attaching the Lines
If your kite came without the lines attached, we obviously have to do so now. They will likely be wound all four together on the winding card in pairs and each pair will be of a different weight or diameter. The heavier ones are the power lines and they attach to the main bridles leading from the front of the kite. Kiters follow the nautical convention of red is left and green is right, so if the lines are of different colors and one of them is red, make it the left line. Likewise if one of them is green (more often blue), make it the right line. Same goes with the handles, if they are marked with separate colors. Often the brake lines are of the same color, but the sleeves around the end loops are color coded.
It is worth acknowledging here that a lot of fliers come to power kiting from the 2-line stunt world where the habit for rigging lines is "red on right". We have seen it in some kitesurfing schools, too. Fundamentally there is nothing wrong with this if it works for you, but if you share your kite with a buddy who follows the nautical tradition as most power kiters do, they are likely to get confused and possibly crash your kite. It's also worth noting that more and more manufacturers are labeling their gear and lines with "L" on the red and "R" on the blue handles. On the new Peter Lynn control bars for de-power kites, if you put the bar down with red on the right, you are faced with a big warning label reading "WRONG WAY".
Some of the older Ozone and plain HQ line sets are marked with both main or power lines one color and the brake lines both of another, leaving you to keep track of right and left. Recently Ozone started to number the lines with little printed fabric tabs at the end, and they match up with numbered handle leads and bridle toggles at the kite. They are numbered left to right, 1 to 4, left main, left brake, right brake, right main. Really fool-proof. HQ and Peter Lynn have followed suite and number their gear in a simailar fashion.
Most kites suitable for beginners will come with proper line sets of the right strength and length for the kite. Some will even come attached and ready to unwind and fly. If you are supplying your own line set for some reason, make sure it is the right one according to the manufacturer's recommendation. After the first time your kite fully powers up, you will have a full appreciation for what could happen if an undersized line broke. If your line is too strong, then you will be carrying around more weight than you need and just hurting performance.
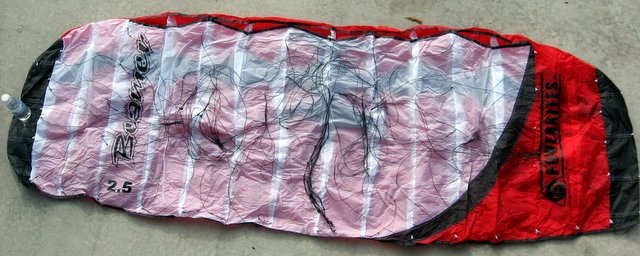
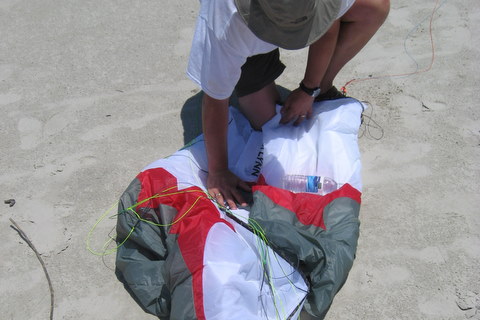
Before attaching the lines, make sure the bridle lines on the kite are sorted out and not stuck together. When you first unfold the kite, you may be shocked to see what looks like a horrible, tangled mess. Don't panic. The bridle toggles, the ends where you attach the flight lines, will normally come attached to a small pig-tail at the trailing edge of the kite, a small Velcro strap, or in some cases to each other. This will keep them from intertwining and tangling, but because they are new, stiff and maybe even a bit sticky from sizing or other coatings, they may just be a bit stuck together and appear tangled. Disconnect the toggles from their storage straps (or from each other) and, being careful to keep them separate, gently pull the bridles apart.
|
|
| Figure 1a. It's not as bad as it looks. Because the bridles have been tied off to the kite's trialing edge, they are not tangled and will easily pull apart when you lay them out. Note the use of a water bottle on the left as a handy weight to hold the kite down in a breeze. |
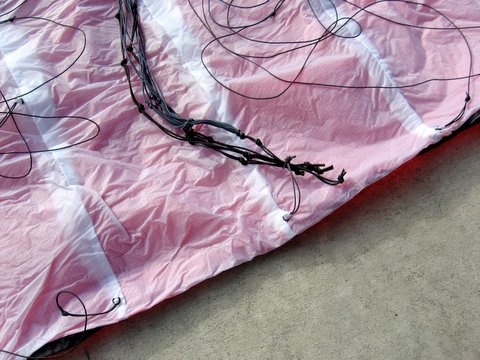 |
| Figure 1b. Figure 1b. Detail of bridle ends tied off to a small loop on the kite's trailing edge in order to prevent tangling. Some kites have Velcro "crock clips" for the same purpose. |
In all but some smaller kites, the primary bridle lines - the ones attached directly to the kite - will be connected in turn to secondary bridles, which then attach to the power lines. Make sure the primaries lead smoothly and in order to the secondaries without any crossed lines or twists. Lay them out away from the kite upwind and parallel to the kite. Some kite's bridles will want to lay on the ground with the brake bridles on the outside and the mains on the inside, but if they are numbered like some new kites are, the mains will be #1 (left) and #4 (right), so you may as well lay everthing out in order left to right with the brake lines in the midle (#2 and #3).
Now unwind the lines and lay them out on the ground stretched out up-wind, starting adjacent to each of the bridle attachment points and ending near the ground stake. Again, if they are numbered, lay them out 1 to 4, left to right. We will attach the lines to the handles first.
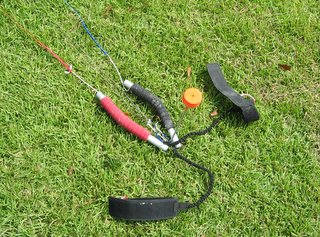
First, let's get the handles ready to recieve the lines and kite killers. With the kite killers attached to your wrists, when you let go of the handles, the kite will flip over on its back, lose power and fall harmlessly to the ground. For your first flights you should not be flying in conditions where you need this feature for your personal safety, but they are useful if you accidentally let go of the handles, as you won't lose the kite or have a bystander be hurt by the flying handles or a wrapped line.
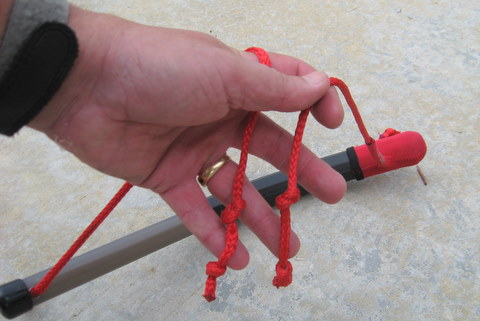
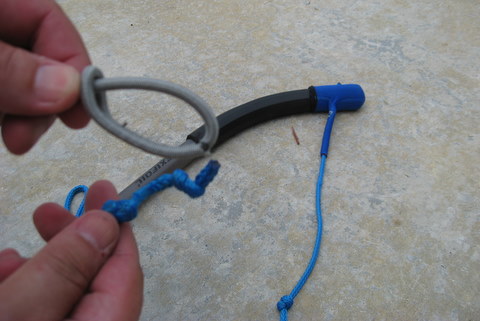
To get the handles ready for the kite killers, we recommend tying a second overhand knot an inch or so from the knots at the end of each handle leader, per figure 2a, and you'll see why in a minute. We really need it on the brake (bottom) leader, but because an overhand knot will shorten the leader, we'll add another matching knot to the top leader to even things up. It's OK if the leaders are a bit shorter, but it's important that they are the same length. We know that an overhand knot will weaken a line by about 50%, but the leaders are oversized to be easier to handle so we are still OK. If your leaders are thin and spindly (not common these days), you can use a figure-of-eight to make a bulkier knot. See figure 2f to compare the two knots.
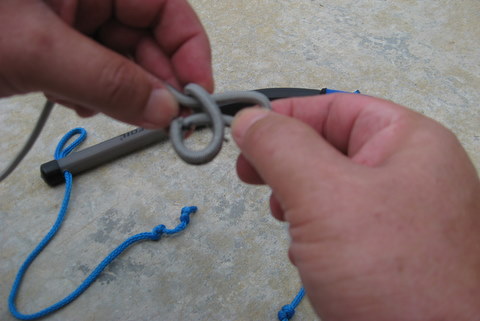
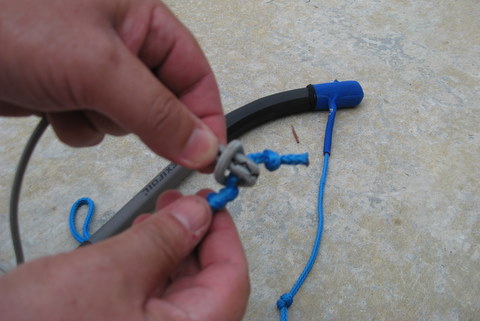
Now let's attach the kite killers. At the loop at the opposite end of the leash from the wrist straps, take the loop of a lark's head knot per the photos 2b through 2d and thread the end of the brake line pigtail through the loop. When you are done, the kite killer leashes will be knotted around the brake line leaders between the two knots with a bit of room left behind the end knot for the brake lines as in figure 2d.
 |
 |
| Figure 2a. Here we have added the 2nd overhand knot about an inch behind the knot at the end of both top and bottom leaders. | Figure 2b. Fold the standing part of the leash line (my left hand) back and feed it through the loop at the end. This loop is formed of sewn bungee cord. Some may be sewn up line or flat nylon webbing. |
 |
 |
| Figure 2c. Pull the bottom part of the loop (held by my right thumb) through so it turns inside out and forms a loop ready to receive the brake line pigtail from the handle. | Figure 2d. Here is the completed loop, forming a slip noose that can be pulled tight around the leader. |
 |
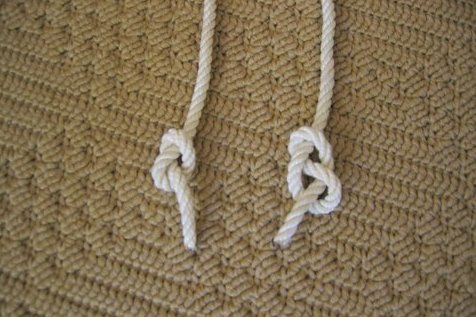 |
| Figure 2e. Put the brake leader through the loop and cinch the loop tight between the knots, leaving some space in front for the brake line. | Figure 2f.Here is a figure of eight stopper knot on the right, compared to a simple overhand knot on the left. The figure-eight knot is bulkier and does not weaken the line as much. They are left loose so you can better see how they are formed. |
 |
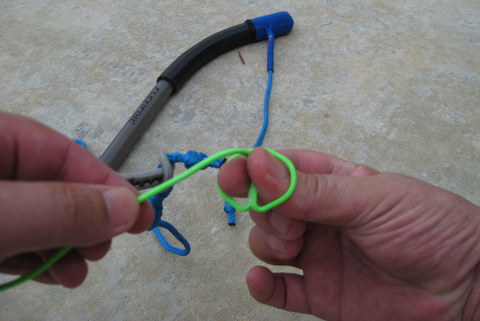 | |
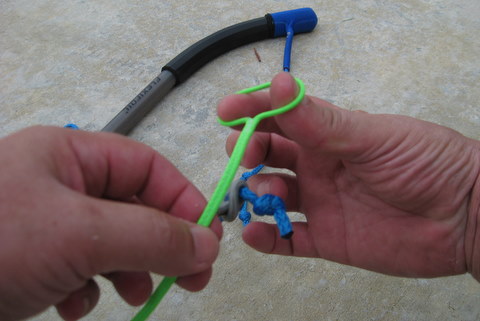
| Figure 3a. Here we put our thumb and forefinger in the end of the loop to open it up. | Figure 2b. Flip the loop over and pinch the line with your fingers and pull it through the loop. | |
 |
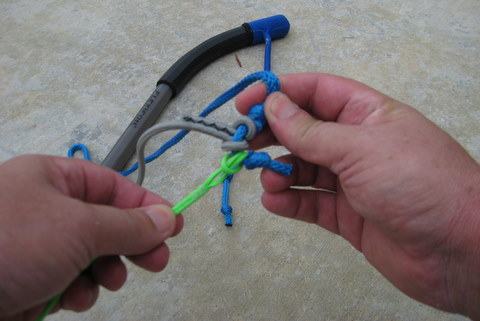 | |
| Figure 2c. Pull the line through the loop so it forms a slip noose ready to receive the brake line leader. | Figure 2d. Put the end of the leader through the loop and pull the loop tight, cinching it beween the end knot and the leash knot. |
 |
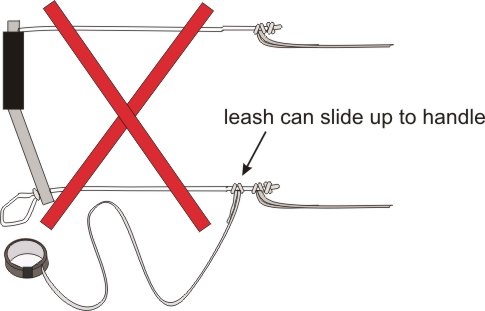 |
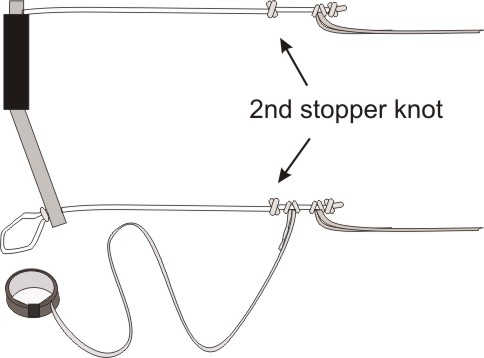
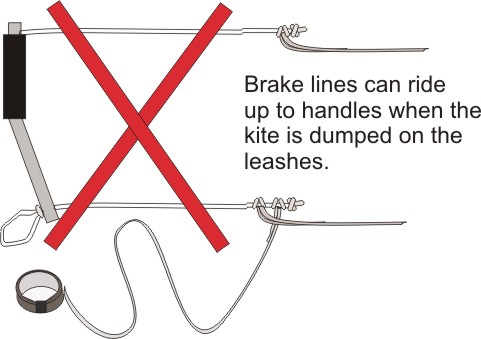
| Figure 4a. With a second stopper knot at the end of the pigtail, a leash attached behind the brake line won't ride up the pigtail to the handles, reducing its effectiveness. A matching knot is added to the top leader to even up the lenghts. | Figure 4b. Without the second stopper, under load, the leash can slide up the pigtail to the handle and reduce the scope of pull on the brakes, diminishing effectiveness. |
 |
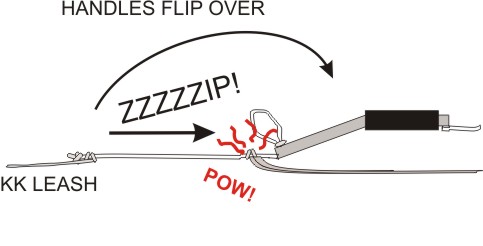 |
| Figure 4c. This is a commonly illustrated way to rig the kite killers, but we don't like it. Without a second stopper knot at the end of the pigtail, when you dump the kite on the leashes, the brake lines can zip up the pigtail to the handles ... (see 4d) | Figure 4d. ...like this, and create enough heat in the tight knot to melt clean through and part the line. |
Because the kite is secured with sand or weights on the trailing edge, there is no need to stake the handles, but keep the stake near by- you need it within reach when you land the kite. Leave the handles on the ground with the tops pointed towards each other and the bottoms poiinted out (assuming the brake lines are on the outside) so that the lines run straight and parallel all the way to the kite.
Now we will attach the lines at the kite bridles. On the way back to the kite, make sure the lines are not crossed.
Attach the flight lines to the end of the bridles using lark's head knots just like you did at the handles. The main bridles will usually have one stopper knot at the end of the toggles, leaving no choice or worry as to where to attach the lines. The brake bridles on the other hand will likely have three or more knots in each, giving you a way to adjust brake line tension for the right flight characteristics.(see photo, figure 5) Follow the manufacturer's recommendations for the default or preferred location to attach the brake lines. Lacking this, start with the middle location. You'll soon enough know if you guessed wrong. Just make certain you use the same knot location on each brake line!
 |
| Figure 5. A Flexifoil Rage brake bridle toggle with a choice of three knot locations to attach the brake lines. Here, the brake line is attached to the 2nd knot in the middle. |
The Power Kiter's Wind Window
Before we take off, we need to understand the dynamics of the space in which we will fly. This space is called the Wind Window. With your back to the wind, the wind window is the half-hemisphere in front of you described by the length of your kite lines. See figure 6. It extends from your left side off your shoulder up over your head and down off your right shoulder and to all points down wind of you within the length of your lines. The point directly overhead of you is called the "zenith". The points along the arc from your left shoulder up through the zenith and down to your right shoulder are the points in the window where the kite produces the least power. The point directly downwind of you and about ten or twenty degrees above the ground is the center of the power zone and that is where the kite produces the most power and pull.
When you take off from directly down wind, it is a "hot launch", since the kite will travel right into the power zone as it ascends, and you have to be ready. If you take off in too strong a wind, you will either be running like a fiend down wind to lessen the pull, or you will do a "superman" and get pulled off your feet and hurl downwind arms and face first into the dirt or sand. There is a way to take off safely in high winds, but it requires skills and practice you do not have under your belt yet. So now you should fully understand why it is we start with a moderate size kite in low to moderate winds.
 |
| Figure 6 The wind window. The lower, deeper and faster you fly through the window, the greater the power and pull. There is little power overhead, but a sudden gust can change that and lift you, which also means drop you just as fast, so beware. In high winds when you risk being overpowered, launch at an angle to the wind and immediately steer to the edge of the window and then up to the zenith. |
Let's Fly
One last thing: This is a good time to empty your pockets of large or sharp objects. If you get overpowered and take a tumble, it would hurt to land on a clump of car and house keys.
Before you pick up the handles, attach the kite killer straps to your wrists. They do not have to be tight, but they should not be able to slide over your hands. Once done, pick up the handles, adjust your grip so that you are holding the the handles near the top with the top or main lines between your index and middle fingers and your tumbs likely resting on the tops of the handles. Keep the lines slack until you are ready to take off.
Before you take off, take a look around to ensure the area is clear. When you're ready to fly, simply let the brake handle bottoms point down and slightly forward with the tops pointed up and take a step back to put tension on the main flight lines. The leading edge will come up and the kite will begin to inflate. Take another step back if need be and the kite will take off. If the wind is marginal, it might take a couple of steps. Hold on tight and be ready to lean back and brace for the pull!
This is a good place to talk about arm positions while flying. It's important to keep you arms out in front of you with your hands less than shoulder width apart and your elbows slightly bent. You will be steering the kite by pulling one handle or the other closer to you body, and sometimes by pushing the other away from you. Don't try to steer by moving your arms to the side or tilting your body; it will look silly and have no effect on the kite.
When going straight up and passing through the 'power zone', this is when you will find out if you have misjudged the wind conditions for the size kite you have. If you find yourself being pulled too much, you may instinctively end up running forward (downwind) to relieve the pull and keep yourself on your feet. Applying the brakes will help reduce pull, since this force increases with kite speed, but the average first-timer will likely not have the presence of mind to react this way before it is too late. Once you understand how your kite behaves in given conditions, you will learn to either brace and be ready or launch the kite from the side of the window and stay out of the power zone altogether. This is covered in our next article.
If you are in real trouble, such as being dragged and out of control, and are wearing kite killers (and you should be), let go of the handles and the kite will flip on its back, deflate and fall harmlessly to the ground while still attached to your wrists by the safety leashes. Then pack things up and wait for less wind (or switch to a smaller kite if you have one).
Assuming you are still standing at this point, let the kite go all the way up to the overhead to the zenith. A well behaved kite will normally slow down and stop before it goes too far overhead and luffs. Luffing is a sailing term used in kiting to describe what happens when an insufficient amount of air flows into the kite and it starts collapsing. Under certain conditions almost any kite can over-fly the top of the window, so a bit of brake line tension or a turn to the left or right with a gentle pull of the respective power line may be in order.
Since the zenith is where the kite produces the least amount of pull, it's a good place to park the kite for a rest. That being said, if you are flying an oversized kite for the circumstances, this is where a gust of wind can lift you and drop you unexpectedly (referred to as getting "tea-bagged"). This is where people have been badly hurt or even killed, and is another reason we do not recommend especially "lifty" kites for novices.
Unlike the single line kites you may have flown that pretty much sit there happily at the end of the line, these foils like to keep moving. In fact, in light or marginal conditions, keeping the kite moving is the only way to keep it in the air, as forward speed literally creates its own wind and added lift. Sailors will recognize this effect as "apparent wind". If you fly into a 'hole' in the wind and the kite starts to luff and fall, try a quick turn in the reverse direction with a sharp pull on a power line. The turn provides a burst of speed to re-inflate the kite and you'll likely fly back into the stronger wind you just came out of. This is especially true of smaller and lower aspect ratio kites, as they snap around faster than larger and broader foils.
By pulling on the left or right flying line, move the kite to left or right. At first, keep the kite about 60 degrees above the horizon, moving it back and forth. This will keep it out of the power zone and let you get acquainted. With a slight flick of the wrist, try adding a bit of brake line tension to a turn and note the resulting tighter turn. Some kites like being led solely by the flying lines with the brakes applied only when needed, and some like to be flown with some slight brake line tension at all times. Just the weight and aerodynamic drag of the brake lines puts a little bit of tension on the trailing edge, so if your kite is set up with the brake lines seeming very slack, this could be normal.
As you become more comfortable with controlling the kite, start working it down lower towards about 30 degrees and note the increasing speed and pull. Explore the edges of the wind window and see how far out to the left or right you can take the kite. On days with light and variable/ flaky wind, a kite might luff a bit when it gets out there, so be ready for a quick about face.
If your arms get tired, you can always take the kite up overhead to the zenith and 'park' it there. If the wind is steady and the kite is stable it should sit overhead reliably enough to put both handles in one hand for a moment to grab a water bottle for a sip, for instance. This is also the best way to hand over the kite to another flyer. Be ready to quickly resume with two hands though, as a gust could start a turn and you'll need to do something quickly.
Common Mistakes (and how to avoid them)
When we hold public clinics or take newbies out for their first flight and they have had no experience with any steerable kite, I can put good money down on the kind of mistakes they will make on their first flights. If you take a look at these ahead of time you might have better luck avoiding them, or at least not feel so bad knowing that you are in company with just about every other first-timer. Let's take a run through and see what the mistakes look like and how to avoid them...
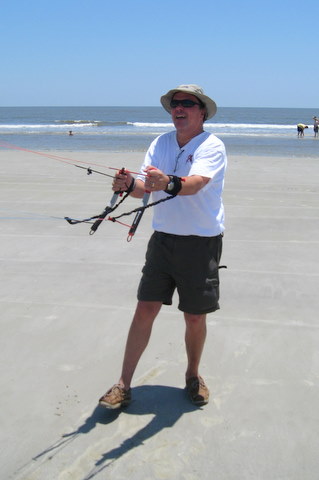
| First, here is what a proper stance looks like. I am braced with my feet apart on the ground and leaning back a bit aginst the pull and ready if the kite powers up to lean back more. I could bend my knees a bit more, though. My arms are out directly in front of my shoulders and bent at the elbows a bit. This gives me good freedom and range of movement to pull and push the handles to steer the kite. I also have room to pull the bottom of the handles back using my wrists in order to activate the brakes. |
 |
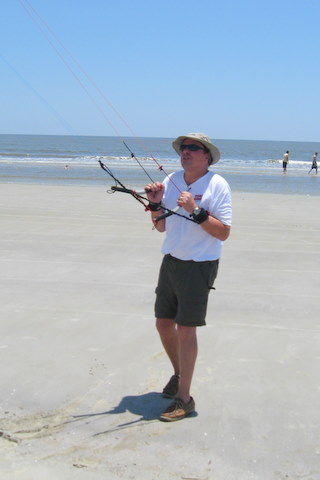
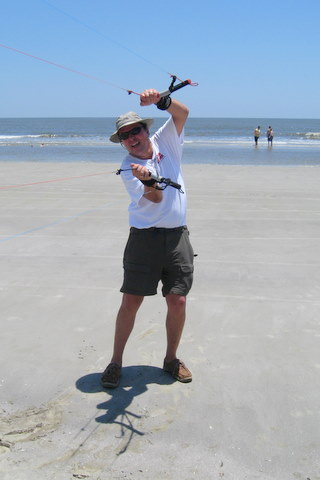
| I've pulled left, I've pulled right and now I have no where to go and can't steer because my wrists are clutched to my chest. It happens all the time when the student tenses up and then forgets to steer or can't steer because they have no range of motion left in their arms. What happens next is that the kite careens into the ground since they can't move their arms to steer. |
 |
| Here is another way to run out of range of motion for steering and everybody does it. It's a common tendancy to try to pull the kite around by reaching way out to the side an lean back like you winding up for a tennis volley. With a stance like this, I might be able to guide an aircraft in for a carrier landing, but I won't be able to steer the kite. |
 |
| Kite handles are not like the steering wheel in a car, but everybody tries this too, often with a little body english thrown in. Instead, you want to think like they are the handlebars on a bike - keep them level while you push one and pull the other. Simply pull left to go left and right to go right. Tilting your body will only throw you off balance and set you up for a fall if the kite powers up. |
 |
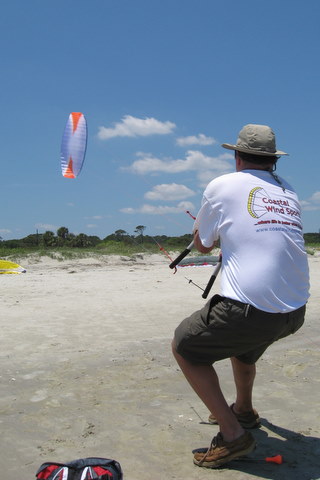
| Here is another example of better form. I am powering a Peter Lynn Core 3 meter through the belly of the wind window in a nice power pass. It's a light wind day so I only have to lean back a bit to hold my balance. My stance is such that if a gust came through I could stay up and get dragged downwind on my feet (called "skudding"). If I lean back too much, I fall on my butt; no big deal. but if don't lean back enough and the kite powers up, I get yarded hands first into the air in a "superman" and eat the beach face first. The kite is flyning fast on it's side but my body is upright and the handles are pretty much upright too. My hands are together out in front and my elbows bent so I have plenty of range of motion to maneuver the handles and brakes. |
 |
Spins and Bashes
If you over-steer and find your kite heading straight to the ground upside down, do whatever you can avoid plowing it straight in on its nose. If the kite hits nose first with force, the impact can produce enough air pressure inside the kite to 'blow a cell' and rip the fabric or blow out a seam. This is not so likely when hitting the ground, but if you are on the shore and crash it in the drink, the water can create enough of a "seal" to create high enough pressure to cause damage.
With the kite heading down upside down, the best bet is to turn hard left or right to get it upright (you can then un-twist the lines as described above if you went the wrong way), or hit the brakes real hard. With the kite flying upside down, the brakes will still work, and if applied hard enough and soon enough, you can not only slow the kite, but stop it in mid-air and back it up, giving you enough room for a 180 degree turn to get you back upright. This maneuver is tricky though, and is counter-intuitive for a beginner. That's because in a panic with the kite diving, many try to pull back on the handles, which only speeds it up and makes things worse. So your best bet then is a panic turn one way or another and worry about un-twisting the lines afterwards.
Reverse Launching
Sooner or later you are bound to find yourself with the kite on the ground nose first. No problem. With the kite upside down, the controls will be reversed for the moment, so a hard application of both brakes will cause the kite to back-up off the ground. In light winds, it may take a good pull, swinging your arms down and behind you to either side with the brakes all the way on. Let it get up at least one kite span high. As it rises, it's bound to start turning one way or another. If not, relax one brake a bit and let the kite turn. As it nears the perpendicular, first release the tension on the brake line closest to the ground, then the upper bake. It will start flying forward and from there you can fly it around and upright by the power lines.
Sometimes this effort will merely result in the kite rising, flipping and landing on its trailing edge. That's fine too, as it gets you to where you want to be for a normal re-launch. Just act like you meant to do it that way.
Depending on the direction the kite went when it hit the ground and the direction you backed out of the predicament, you may end up with twisted lines. If so, no problem, just fly it up to the zenith and spin it or do a little dance on your feet to unwind it.
With some practice, you will be able to back an inverted kite off the ground, turn it to the left or right, change direction and fly it out in a smooth, controlled and deliberate fashion.
Landing
The neat thing about quad line kites is there ability to back down, trailing edge first for a gentle and controlled landing. When you are ready to pack it in or just want to park the kite for a rest, fly the kite to the middle of the window downwind and point it up. Before it gets too high, gradually and evenly apply the brakes, pulling the handle bottoms towards you until the kite stops and begins to back down. You'll have to be on your toes and make minor adjustments to the tension of each brake line in order to keep the kite pointing up while it backs down. If you are having trouble exerting enough pressure on the brakes or keeping it steady, slide your hands down the handles so your fingers are below the top lines. You'll have more leverage on the brakes this way.
Adjust the brake tension as it nears the ground so it doesn't hit the ground too hard. This takes a little finesse and practice, especially in gusty winds, as the kite may want to take off back up, so you may have to be assertive with the brakes. For the first time, consider any landing with the right side up a success.
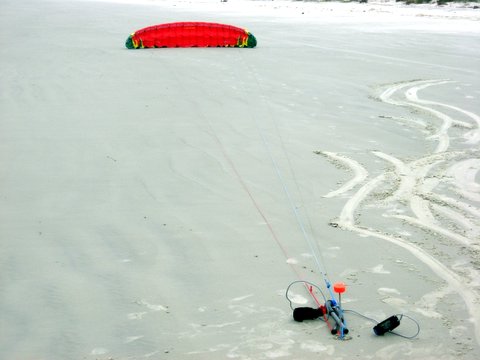 | ||
| Figure 7a. A Flexifoil Blade IV parked happily with the handles staked by the brake loops and waiting patiently to fly. Note the skid marks to the right from being dragged on the sand while standing ("skudding"). | ||
 |
 | |
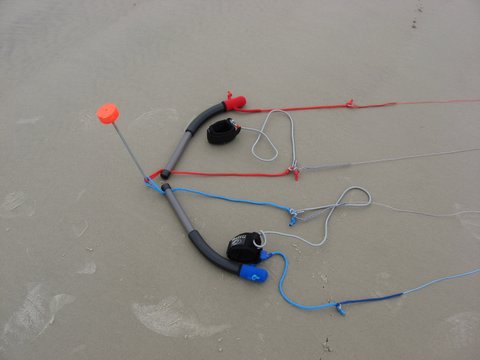
| Figure 7b. Handles staked to the beach sand with the shaft through the ground stake loops at the base of the handles. The kite must still be secured with sand and not launched yet, since the lines are not pulled taught. | Figure 7c. Handles without ground stake loops draped over the stake by the end of the brake line pigtails. |
When the kite is on the ground, immediately flip the handles forward with the bottoms pointing towards you, keeping tension on the brakes. To keep the kite on the ground, you'll need to stake the kite by its brake lines. Put both handles in on hand, keeping the tops pointed to the kite and grab your stake with the other. Thread the stake through the brake loops on the back of the brake lines at the base of the handles, then drive the stake into the ground. (See figure 7a & b) If you do not have brake loops, put the stake in the ground and drape the handles over the stake right where the brake leaders connect to the handles (see firgure 6c). Staking the kite thusly will give the power lines enough slack to lie far enough on it's back to keeping it from flying. Still, there is nothing stopping a gust from flipping the kite, so if you are going to turn your attention elsewhere for a bit, it's a good idea to weight the kite down like we did at set-up and launch. Experimentation with your own kite will be your best guide.
NOTE: Any time the kite is on the ground and you need to let go, always stake it by the brake lines to keep it from taking off!
STAKING TIP: If you do not have stake loops on your handles and have to drape your lines and handles around the stake by the brake ends as described above, establish a habit of always putting the left or the right down first the same way. I'm a lefty so I put my right line and handle around the stake first, leaving the left on top. This lets me know to pick up the left handle first, which always saves a snag or tangle. If the reason for this is not clear to you now, it will be the first time you go to pick up your kite from the stake.
Bailing when things are Bad
There are times when you launch a kite and you quickly wish you hadn't. Perhaps the wind is too strong and you are having trouble controlling or landing the kite. Perhaps the lines are not adjusted or set up properly and you just can't seem to control it. In "Quad Kiting 102: Next Flights with a Four-Line Kite", we talk about how to diagnose and adjust a misbehaving kite, but right now we need to get you on the ground safely.
Assuming that you are wearing kite killer leashes, the easiest and safest way out of a bad kite session in to let go of the handles. The kite killers grab the kite by the brake lines, flip it on its back killing the lift, and it drops to the ground.
If you are not wearing kite killers or think you have enough control for a more graceful exit, you can land at the edge of the window. Twin line kite fliers will know this method as the normal way to land a dual line kite. From the zenith, choose a direction and pull one of the main lines to move the kite that way. Keep greater tension on what is now the power line closest to the ground and the kite will edge down the window towards the ground, always pointing into the wind. When a wing tip touches the ground, have a helper grab it or, lacking assistance, quickly slap both handles in one hand and with the other, reach out an arm's length and grab and pull both brakes lines to kill the kite. You can now safely stake the kite and pack-up.
Packing Up
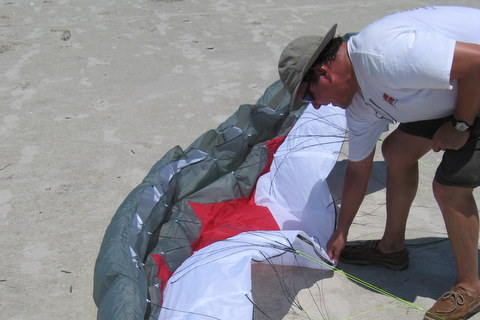
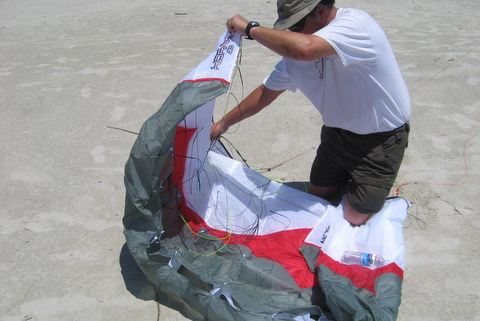
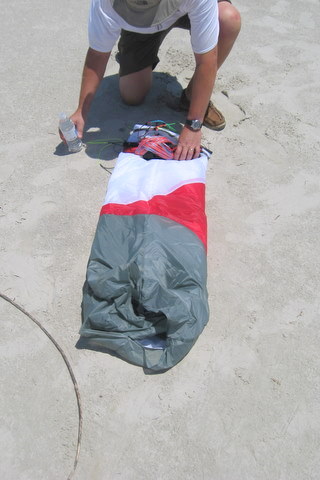
If it's time to go and you've already staked down your lines as described above, then you are half way home, as the rest goes quickly. That's because we are going to leave the flying lines attached. Go back to the kite with your handy weights, or pick them up off the ground if they have been there since take off. Grab the trailing edge at the center of the kite and pull it towards you until it reaches the bridle toggles where the main lines attach. You will want to be able to fold the wing tips to the center of the kite with the bidles draped inside. Put a few of the weights along the trailing edge to keep it in place, since this is where the wind can get under and flip the kite, creating and unruly mess. Grab one of the wing tips and fold that half of the kite, bringing the tip to the center section and tuckin in all the bridle lines into the fold as you go. Take weights from the folded section's trailing edge and place them on top as needed, again, at the trailing edge to keep the wind out of the kite. Take a look at figure 8.
 |
 |
| Figure 8a. Standing between the lines, grab the center of the kite and step back upwind until you are even with the bridle toggles. | Figure 8b. Pinch the center of the trailing edge on the ground with your knee and reach for the wing tip, tucking the bridles and toggles into the fold. |
 |
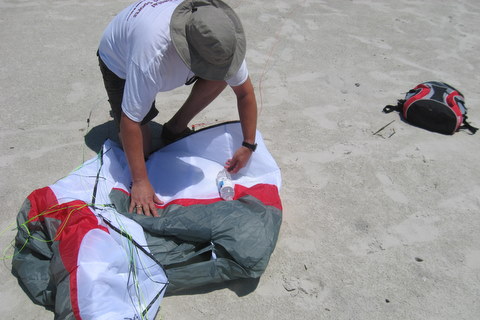 |
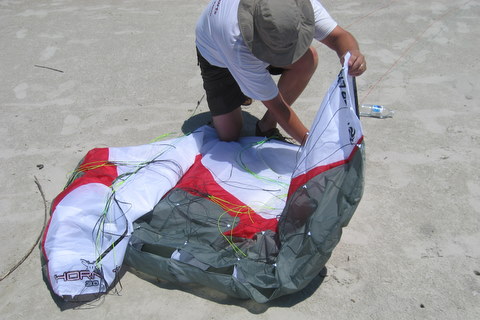
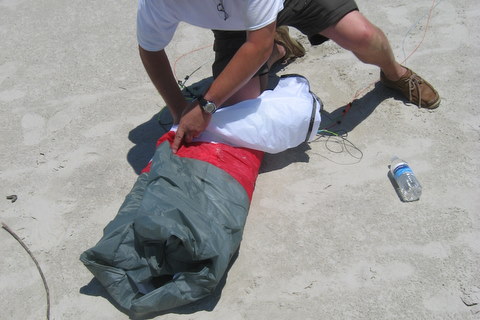
| Figure 8c. Bring the tip to the center and pinch under your knee, squaring out the fold of the kite and tucking things in. | Figure 8d. Smooth everything out, tuck in loose bridles and wipe off debris. Notice the water bottle on the kite, acting as a thrird hand to hold things down in the breeze. I move it around with every fold to help keep things in place. Handy if I get thirsty in the hot Georgia sun,too! |
 |
 |
| Figure 8e. Fold the outside edge to center agian, smoothing as you go, and repeat if necessary until the fold is about as wide as the handles are long, give or take. | Figure 8f. Repeat the whole process for the other half of the kite, laying the halves together neat and flat. |
 |
 |
| Figure 8g. Fold the halves together and smooth out flat and neat. | Figure 8h. Put a weight like a water boottle and/ or the kite bag on the trailing edge to keep the wind out while you leave the kite to wind the lines. |
We are keeping the lines attached with the kite, since it is an easy way to keep the bridles and lines from tangling, and it will speed your launch on the next outing. As your stable of kites grows, try to keep a set for each kite, if you can afford to. Remember, if your next kite is much bigger, it will probably require a heavier line set anyway. If you must disconnect your lines, make sure you secure the ends of the bridles as they were when you first un-packed the kite. Before we finish packing the kite, we have to wind the lines.
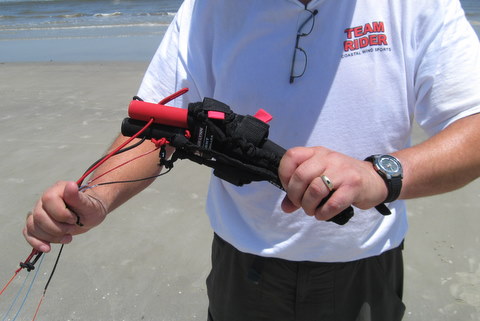
Winding the Lines
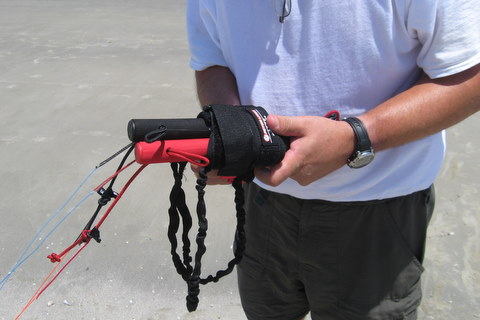
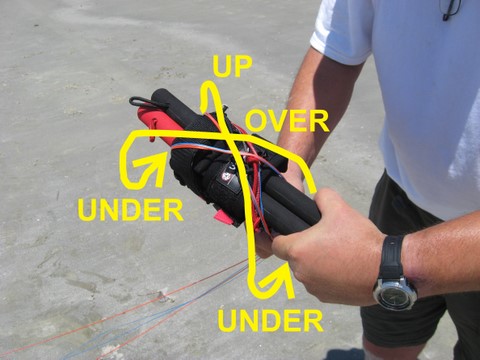
Now go back to the handles, un-stake them and hold them together in one hand by the ends near the brake attachments. If you have kite killer straps, wrap them around the handles in the middle near the bend. Now grab all four lines together and wrap them around the handles once near your hand that is holding the brake ends. Next wrap them diagonally across the middle section (and over the kite killer straps if they are there) up near the tops of the handles, then underneath one half turn. Now wrap diagonally down across the middle, crossing the first diagonal wrap, around and under the brake end one-half turn. You should have just completed a figure of eight. See figure 9.
 |
 |
| Figure 9a. Put the handles together side by side and wrap the kite killer cuffs around them at the center of the bend in the handles, making sure they wrap around the brake leaders, so that the brake lines dangle out at the top of the handles next to the main leaders. | Figure 9b. Hold the handles by the bottoms, tucking the dangling leashes under your fingers to keep things tidy. Then grab all four leaders together with your winding hand and wrap once around the tops of the handles. |
 |
 |
| Figure 9c. Now wrap once around the back of the handles diagonally towards the bottoms on the other side. Wrap straight across the bottoms and up around the back diagonally again, crossing the other wrap, continuing in a figure eight as shown in the picture. | Figure 9d. Walk towards the kite as you wind, keeping even, slight tension on the lines with your fingers. You will find yourself walking kind of sideways. You will develop a fast rhythm with practice. |
Keep going around and around following the same pattern as you walk to the kite. Don't walk too fast; it's a good idea to keep a bit of tension on the lines to help keep them straight. It will be awkward at first but you will soon develop a rhythm and will be able to walk at near normal pace. It does not matter whether you use the left or right hand to wind, but the key to keeping things tangle free is to unwind them exactly the opposite way with the same hands the next time you fly.
Some people like to wrap straight around the axis of the handles in one direction all the way back to the kite, and this can work too. Because you are winding the same direction the entire time, there is one heck of a twist in the lines by the time you get back to the kite. With the figure of eight method, you are first winding one direction for a half turn, then the other, and so on.
With that being said, if you do notice any twists in the lines the next time out, they probably came from moving the handle around in the bag. This can also happen when taking the kite out of the bag for cleaning or maintenance back home, so be mindful of this if you unpack the kite between flights.
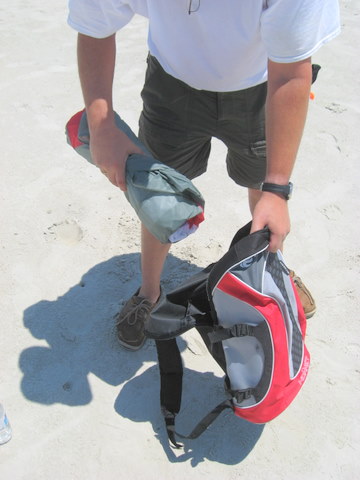
When you get to the kite and come to the end of the flight lines, tuck the ends, with the bridles still attached between the handle tops to secure them. Place the wound handles on top of the kite along the trailing edge. Now roll up the kite around the handles, gently squeezing the air out and brushing off sand and debris as you go. Now it's ready to go back in the bag. Look at figure 10.
 |
 |
| Figure 10a. Swap the weight on the trailing edge for the handles. Always lay the wound lines and handles on the kite with the same hand in the same direction. | Figure 10b. Roll the kite up around the handles to the leading edge, brushing off sand/ dirt and debris as you go. |
 |
|
| Figure 10c. It's all ready for the kite bag, neat and tidy. If your kite did not come with a packing strap, consider getting one to keep things rolled up tight and neat. Dont't forget your accessories like ground stake and other gear. |
Lastly, don't forget your kite stake and weights. It's really easy to leave these behind and will be seen by others as unsightly litter.
In subsequent sessions, you should become much more comfortable with the kite and feel confident in a broadening range of conditions. You can put the power kite to work with some "skudding" (being intentionally dragged on your feet across the ground). But before you move on to a kite buggy, land board or skis, you should have a good mastery of basic kite handling. Just remember as you go along, if you get too confident and forget to respect the kite and wind, discipline will be metered out swiftly and mercilessly!
Last edited 1/31/2011
Copyright 2006, 2007, 2008, 2010, 2011 Coastal Wind Sports, Inc.