I have been playing for a while with an idea to construct a buggy tow hitch, used to have one buggy tow another in "tandem" fashion. After seeing comments in on-line forums that some folks would like to make one but do not have many tools, I thought about creating a design that could be constructed in an apartment with only basic hand tools and a power drill. This is my second version of the tow bar and a hitch to be mounted on my Wide-axle Flexifoil Bug.
|
|
|
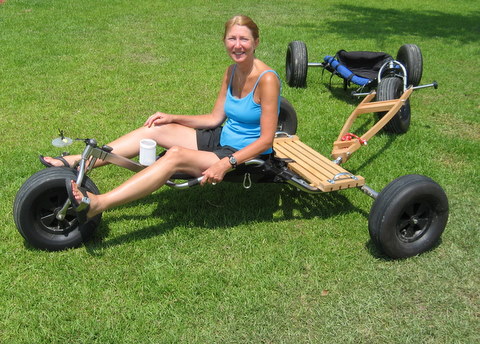
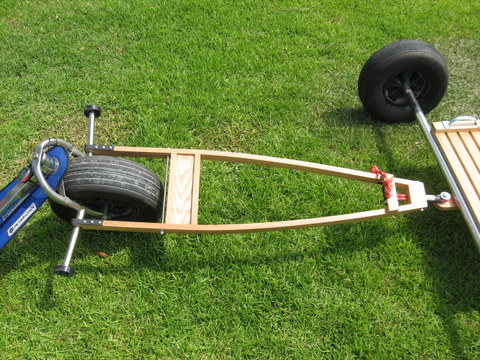
| Figure 1A. Joan trying out the Flexifoil Wide-axle bug equipped with cargo deck, looking for a passenger for the trailing Peter Lynn Comp XR+. | Figure 1B. Overview of the towbar. It's made mostly with 1x2" red oak with some 1x3 in the cross-pieces. Bent metal clips grip the foot pegs of the towed buggy. |
NOTE: These are not design recommendations or plans, or a product offering. These are notes on an experimental design that has not been fully tested. There are many safety concerns here, some of which have likely not been discoverd yet.
I will modify these notes as the project evolves and the tow bar and hitch are tested and improved. Suggestions are welcome.
TOW BAR
Even if not used for towing a second buggy, the tow bar (Figure 1) is an easier way to drag a buggy on or off a beach or field where there are inclines involved. It is very frustrating to be pulling a buggy with a leash and then have to go down hill or down a ramp and have the thing slam into the back of your legs. A rigid tow bar prevents this.
The tow bar is made of 1x2" red oak stock. The two length-wise stingers are seperated by a cross-brace and then bent together at the front block. Red oak is strong, so the bending forces are great and would pop the heads off of screws at the back of the rear cross-brace, so a threaded rod with washers and nuts takes up that tension load right behind the cross-brace. The block at the front is made up of three pieces of 1x3" stock glued up. Another threaded rod takes up the tension load there, too. I had a 14" strip of wood attached accross the top of front of the bar cruciform style as a handle bar for towing, but it got in the way on tight turns when attached to the towing buggy. I will probably put another one accross the bottom of the bar that won't get in the way. When hand towing the bug from the parking lot, the disconnected rope loop can be used as a handle.
 |
 |
| Figure 2A. Close-up of clips attached to the foot peg of the towed buggy. Clips are made from 3/4 x 1/8" steel stock. | Figure 2B.Close-up of the towing attachements off the bug. The captive clips swing open on a pivot screw to disconnect from the buggy. A machine screw through a 3/4" aluminium tube forms a little finger-grip for the swing clip and the scew head (hidden underneath) snaps into a detent drilled into the wood when closed. |
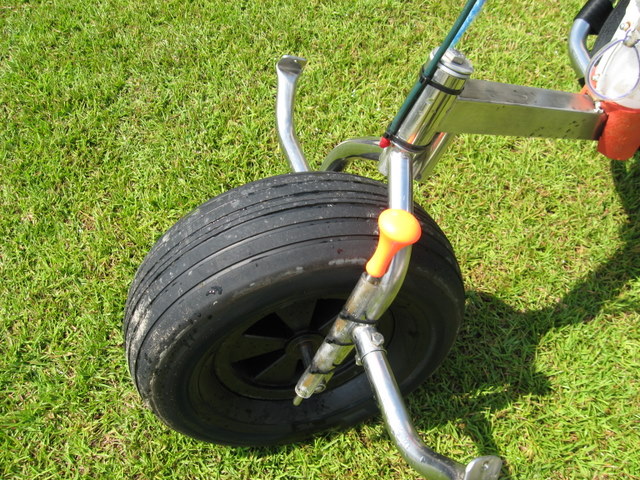
A 1" hole is bored through the front block of the tow bar length-wise and a 6" piece of 1" pipe (with tapered pipe threads) is screwed into it. The pipe holds a loop of 1/2" braided sheathed running line from the marine store to serve as a hitch. Figure-eight stopper knots are tied in the end of the line to secure it in two holes drilled in the front coss-piece. One of the holes in the cross-piece is cut out to form a notch so that the knotted line can be removed to loosen the loop and disconnect the hitch. A piece of 3/4x 1/8" steel stock on a pivot screw slides over the notch in the cross piece to secure the knotted line and rotates to open and release. The photos will explain better.
 |
 |
| Figure 3A.Close-up of tow bar front end attached to the hitch. Rope loop around the hitch leads through a piece of pipe threaded into front block and is secured with stopper knots to the cross-piece. | Figure 3B.Close-up with swing-clip opened to release the stopper knot from the notch, allowing rope to losen and be removed from the hitch. |
 | |
| Figure 3C. Close-up of tow bar front end block. Block is made of three pieces of 1x3" wood glued up and notched for the stringers. 1" hole easily accepts pipe threads from the pipe section. Slackened rope loop make a nice handle for hand towing. |
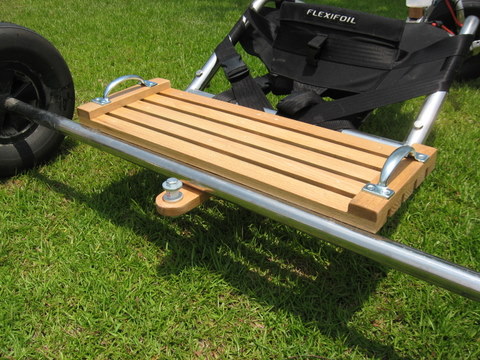
The deck is constructed of 1x2" and 1x3" red oak stock. There are four fore-and-aft stringers under the cross-pieces. The outer-most stringers are space to fit just inside of the buggy's side rails and are cut to length for a snug friction fit between the axle and the cross-bar behind the seat. The inner-most stringers are centered and spaced to mount a 1x3" beam that sticks out the back under the axle to mount the hitch bolt. The cross-pieces are glued and screwed to the stringers with screw holes pre-drilled, countersunk and covered with wood bungs. 1x3" stringers are glued down at the outer ends of the cross-pieces and offer a good surface to mount standard door handles. The handles are as much to offer bungee lash points for strapping gear and stuff as they are for a would-be passenger.
 |
 |
| Figure 4A. Cargo rack detail. Fore-and-aft stringers can be seen under the cross-pieces. Outside stringers snap into the buggy frame with a friction fit. | Figure 4B. Rear veiw showing the hitch bolt. The bolt goes through a spacer made of pvc pipe that holds the big fender washers apart. |
The hitch bolt is just a 1/2x 2 1/2" bolt with wide fender washers seperated by a 1" piece of pvc pipe as a spacer. When towing a buggy, pulling loads are taken up by the rope loop. If the towing buggy decelerates, compression loads are taken up by the pipe pressing against the washers. This way the rope is mostly protected from chafe.
 |
| Figure 5. Cup holder cut from a soft plastic shampoo bottle. I'll put more padding in back of the wood block, but left it clear for the photo. |
This cup holder was fashioned from a shampoo bottle that is soft enough to deform and not take out the family jewels in a wreck, but stiff enough to hold a water bottle or a beer. Two scraps or 3/4" hard wood were glued together and cut at an angle of 25 degrees to form a level platform wedge. The plastic cup is fastened with screws from the inside. Metal straps attach to the front down-tube bolts. The rim is double stick foam tape covered with white plastic electrical tape. Drain holes are drilled in the bottom edges.
This should work for any buggy.
Carry a ground stake
A ground stake is a must-have in any buggy and a safe way to carry it is just as important. When you end or interrupt a session and need to put the kite down, you'll of course need a way to secure it. If you're away from buggy camp and you have a bridle issue that needs tending, then you'll need a way to park it for sure. You could flip the buggy over so it doesn't roll and put the handles around something like a foot peg, but that's a pain and not neccessarily secure. The problem is you just can't toss the stake in the seat next to you, because when hit a bump or flip the bug with you in it, you don't want a pointy ground stake flying in the air anywhere near you. Go to anyplace with a bunch of kite buggies and and the most common solutuion you'll see will be like like the one in figure 6. Get a scrap of hose or vinyl tubing and lash it to the front fork with zip-ties. Sized right, the soft plastic will offer enough friction to keep it there on bumpy rides or even a flip. Funny part is, curious bystanders on the beach will often point to it and ask me what it is, and if I say "Oh, that's the gearshift...", some folks will actually buy it for a minute.
Just remember one thing. When picking up the handles to launch the kite, put the stake away in the holder first before you take off. More than once I have felt silly standing there with the kite overhead, a handle in each hand and the stake on the ground next to me. Quickly putting the handles in one hand to put the stake away before the kite gets out of hand is ususally a clumsy scene at best.
 |
| Figure 6. A piece of vinyl tubing tie-wrapped to the front fork makes a safe, secure and convenient place to keep your stake. |
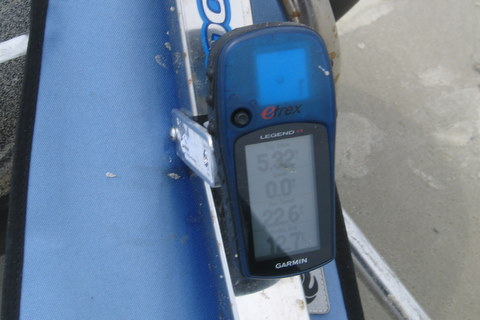
GPS Mount
I mounted my GPS to the bug with a handlebar mount available from Garmin, the GPS manufacturer. Of course the buggy does not have handlebars, so I made a bracket to support round post to which the mount can be afixed. See Figure 7. The bracket is simply two pieces of 1" x 1/8" aluminum stock, one of which is bent as shown to match the down-tube width. The post is 1/2 inch (inside diameter) PVC with a scrap of 1/2" hardwood dowel epoxied inside. The aluminum pieces are held together at the top by a stainless wood screw that is countersunk and screwed into the wood-cored post, and at the bottom by two stainess screws joined underneath by a 1" long hex nut meant as a connector for threaded rods. I gave the nut a shot of spray varnish I had lying around to slow down the inevitable corrosion. The aluminum can be bent by hand using a bench vise or clamped between wood scraps. Mount the GPS with the handlebar clip and adjust to the best viewing angle.
Some GPS mounts can be screwed on to the flat top of the down-tube, but this bracket, while a bit more work, lets me avoid drilling holes in the bug and makes it easy to move to my other buggy.
 |
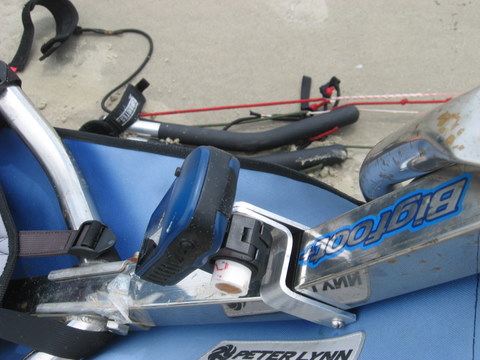 |
| Figure 7a. Garmen E-Trex Legend GPS mounted using the optional handlebar mound and a bracket strapped to the headstock tube. | Figure 7b. Detail of bracket fashioned from aluminum stock, stainless hardware and a scrap of PVC tube with hardwood dowel glued in to supply the "handlebar". |
For the GPS, I use a Garmin E-Trex Legend H with a basic Grayscale screen. The trip computer screen lets you choose which data to display (current speed, max. speed, average, distance, etc.) and has a "large number" display option that is easily readable while running down the beach.
Copyright 2007, 2008, 2009 Coastal Wind Sports, Inc.
Last modified 5/27/09
Angus Campbell