Tips based on FAQ's from our customers.
Angus Campbell, Coastal Wind Sports, Inc.
Contents & Links...
The Peter Lynn Synergy comes with complete instructions and a great video DVD, but there are a couple of tiny things left out and a few things that generate frequent questions. Based on what we have found and the questions that come to us from customers, we have prepared this tutorial to help you speed your set-up and get you on your way to flying.
There are actually two manuals that come with the Complete R2F Synergy. One is the kite manual, and the other is a smaller one that is with the De-power Control Bar. The one with the bar was printed after the kite manual, so if there is information in the two that are at odds with each other, go with the bar manual.
Wingtip sticks
Earlier ARC's had carbon fiber
rods, but the newer kites have aluminum spars (called "sticks" in the
Peter Lynn world). They are segmented to come apart and shock-corded to
stay folded together, just like aluminum tent poles. In fact if you
ever break or lose one, you can buy tent poles as replacements and trim
them to the right length with an inexpensive tubing cutter.
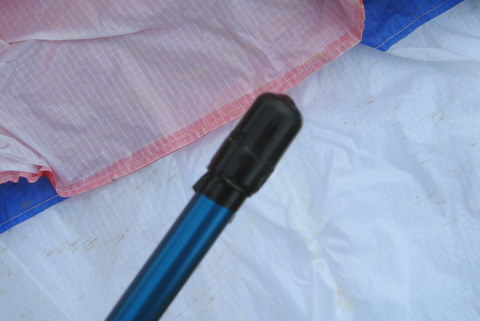
Our next tip is, well, about the tips. The sticks have plastic caps on the ends, and these can come off in the stick pockets, especailly on new kites where the pockets are not worn in and are still stiff. It's a real pain to fish them out, so simply wrap the ends of the tubing and caps with some electical tape to keep them secured. See figure 1.
|
| Figure 1. Wrap the end of the tips with electrical tape around the stick and cap to keep the cap from coming off in the kite stick pocket. |
"Kook Proof" line attachment
The Kook Proof
system, an odd translation of "Goof Proof", is designed to make it
impossible to hook the rear lines to the front bridle and vice versa.
Color coding insures that left and right don't get mixed up either.
Remember that de-power line sets are all the same strength so there is
no obvious difference between the front and rear lines. We use red for
rear and blue for front/ center lines. In any event, as you lay out
your lines, make sure the red-sleeved lines are on the left and the
gray sleeved set are on the right.
When you unpack the kite sail, you will notice something funny at each of the rear bridle pigtails where the lines woould normally attach. There will be a little looped pigtail about 2" long attached to the bridle with a larkshead knot on the bridle and it will be marked with a tag. See photo in figure 2a. Loosen the larkshead and remove the small pigtail and remove the tag and plastic loop. Now, following the diagram on the little card, slip the pigtail on the end of the respectve rear flying line so that the knot is at the end of the assembly. See photo, figure 2b. The gray pigtail goes on the right line with the gray sleeve and the red one goes on the end of the red-sleeved line. Instead of attaching the line to the bridle with a larkshead knot, we attach the bridle itself to the knot on the line- a subtle difference but it's what keeps us from the attaching the front lines to the rear bridles and vice versa. The front lines attach to the front bridle with a larkshead knot like we are used to, but they cannot be attached to the the rear bridle point since there is no knot, only a loop.
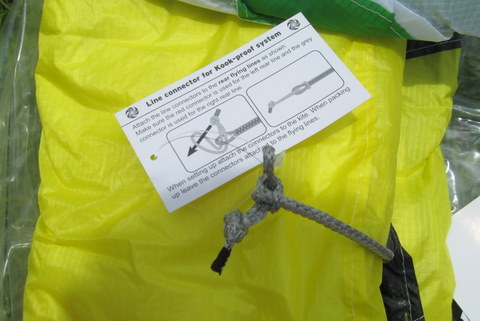 |
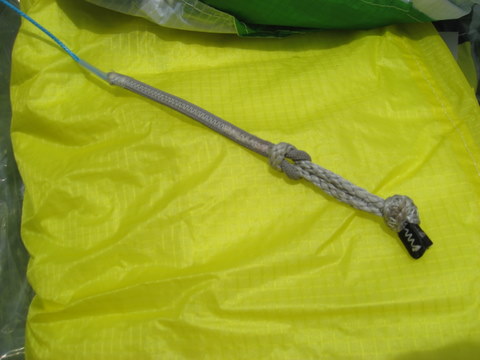 |
| Figure 2a. Bridle with pigtail attached for shipping. Take it off the bridle and attach to the respctive fying line as shown on the card. | Figure 2b. Assembled pigtail and flying line with knot away from the line loop. |
Line set-up at the bar
The instruction manual
with the bar gives very detailed instructions on how to rig the left
line and left leader with the two metal rings and safety leash (page
3). Just follow the instructions for points A,B,C and D.
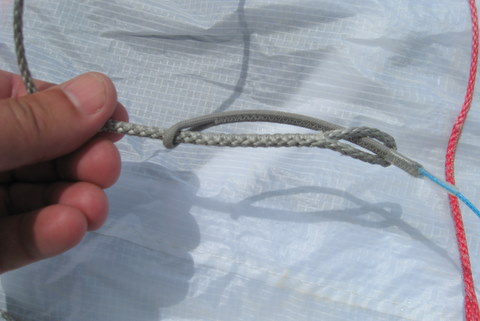
The center / front lines attach to the leads on the center with larkshead knots just as we are used to. The funny part is that they forget to tell us how to attach the other (right) rear line! The solution is simple to the experienced ARC rider but will confuse newbies, since there is only a loop on the leader and nothing to put a larkshead knot to as we would expect. Well the solution is just as simple as the larkshead, but different. Look at the photos in figure 2. You simply pass the loop of the leader line through the open loop of the right flying line, then run and get the OTHER END (the kite-end) of the flying line, bring it back to the bar, pass it through the loop in the leader, then run it back to the kite. The photos shopuld make it clear. Now you know why we have to do this first before attaching the lines to the kite. Note that the photos were taken using the kite as a backdrop for photo clarity, but the line attachment will usually be done away from the kite back at the bar on the ground.
 |
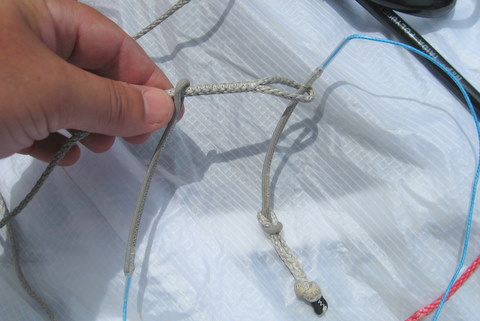 |
| Figure 3a. Pass the loop of the leader line through loop in flight line. | Figure 3b. Run and get the far end of the flight line from the kite-end, then paas it through the open leader loop. |
 |
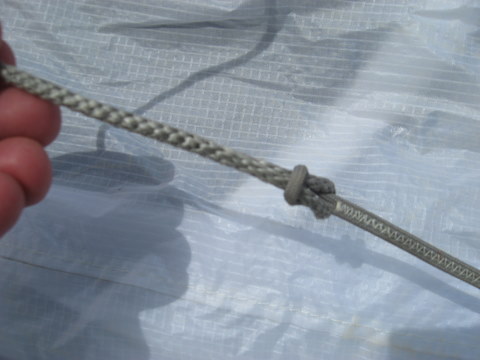 |
| Figure 3c. With the kite-end of the line stretched back to the kite, the knot slips together. | Figure 3d. Completed connection. Dumb simple. |
Launching tips
Twinskin ARCs have a
reputation in some circles of being difficult to launch, but this is
simply not true. The launch sequence is just very different from other
kites and that is what throws some people. The manual and the video DVD
are very clear about how to launch the Synergy and if you follow their
procedure closely, you should have no trouble.
About the only time we have trouble launching is with gusty and shifty winds when the kite is blown back and forth to the side and fouling the lines around the downwind tip of the kite. This is where a helper is really handy to steady the downwind tip of the kite and lift it for you when you launch, keeping the lines free and clear. The key to self launching un-assisted is timing and quick action. When everything else is all set and laid out neatly, set the lines from the downwind tip on top of the kite in the Velcro launch assist tab, then run like hell to the bar and launch the kite before another gust comes along.
The video does mention that you should launch un-hooked so that you can quickly dump the kite on the leash and safety if you have misjudged the wind and get into trouble. In practice, unless you are launching in high winds, this is not necessary. When you launch using the specified procedure with you standing 45 degrees behind the kite and the wind, the kite goes right to the edge of the window while it inflates and remains pretty tame. In light winds, launching hooked in is fine and arguably more convenient, especially in very light winds when you will want a free hand to yank on the center lines to get the kite moving out of a stall while you steady the bar with the other.
So we have said that launcing an ARC is pretty easy and you will find that it is really a snap once you are used to it, but we will leave you with a few more tips for various conditions to help you along...
Last updated 7/06/09
Copyright 2009, Coastal Wind Sports, Inc.