Angus Campbell, Coastal Wind Sports
Photos by Coastal Wind Sports, Inc. unless noted otherwise
Choosing the right traction kite for your first time out is daunting. There are a lot of choices of makes, models and control options and arriving at a good choice is not an intuitive process without some help. The right choice will give you years of enjoyment and extreme flying action, and the wrong choice will disappoint and can even hurt you. These kites are more powerful than they first appear, and even small “fun” kites designed to be safe for youngsters in light to moderate winds can really beat up an adult in high enough winds. In this tutorial we will try to answer most common questions and help you properly select your first power kite.
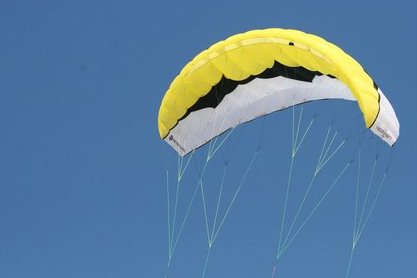
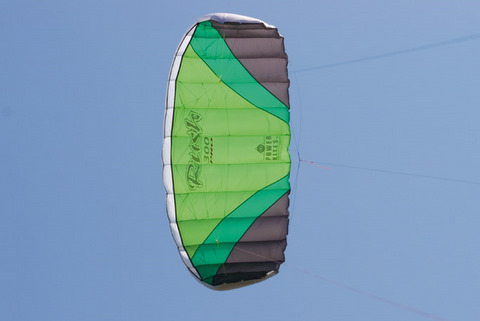
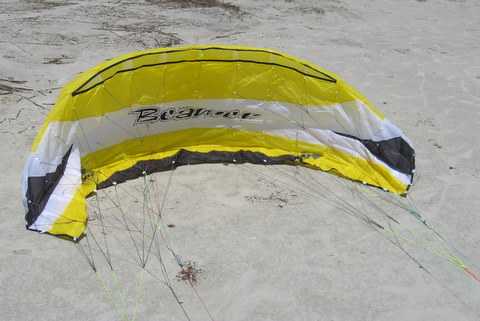
First, a bit about kite terminology so we can avoid some confusion. The terms “traction kite” and “power kite” can be used interchangeably. The term “quad-line kite” is simply referring to a four-line kite and those terms are also interchangeable. Because the side profile of these kites are shaped like an airfoil, they are often referred to simply as “foils”. Specifically, the type of kite we will be focusing on here, whether of the two-line or four-line variety, are “fixed bridle, open cell foils”, and you’ll understand why and what that means shortly. See figure 1a for an example of a four line, open cell, fixed bridle foil.
In case you have started to read up on power kites and have a lot of new terms floating in your head, let’s avoid further confusion by specifying the kind of kites we will NOT be focusing on here. We will not be covering “de-power” kites and their water-born cousins, the horse-shoe shaped “C” kites or “bow” kites that you see kitesurfers and kiteboarders using. Those are also often “leading edge inflatables” or “LEI’s” (see figure 1b), since they use air bladders to hold their shape on the water and make them water re-luanchable in the event of an off-shore dunking. Another type of inflatable kite newbies should avoid without professional instruction are the “Twinskin” or “ARC” kites made by Peter Lynn. We will talk a little bit more about de-power kites later, just to clear things up.
|
|
|
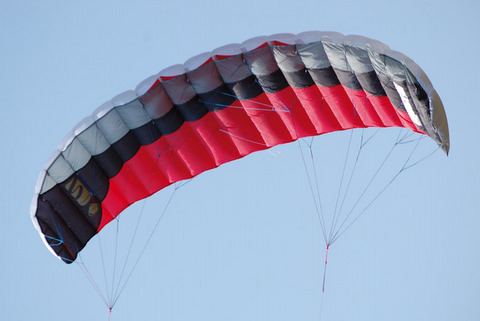
| Figure 1a. Here is a Hornet 3.0 from Peter Lynn, an example of a four line, open cell fixed bridle foil and a great kite to start out on. Bridles leading to the front and rear lines are clearly visible. Photo credit Peter Lynn Kites | Figure 1b. Here is an example of a Leading edge inflatable, or "LEI" ready for launch. Meant for kiteboarding on the water, these kites are powerful and should be avoided by novices without proper professional instruction. |
Before we dig into the details, let’s clear up a few things that are not always obvious for the first time power kite shopper and establish some unbending truths.
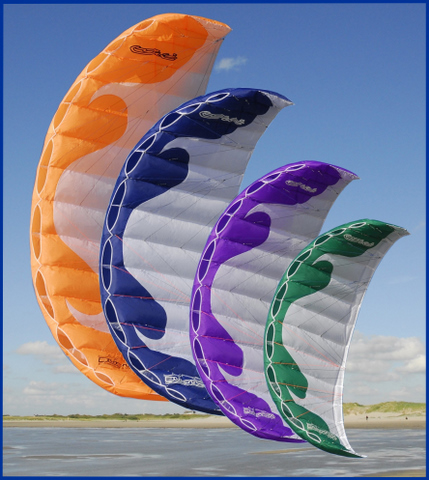
Size Matters
The first truth is about size. With power kites,
size does matter and bigger is not better, but is in fact potentially
dangerous and a waste of money for the novice. The types of kites we are talking about
here come in sizes up to 8, 10, even up to 16 square meters, but we
will be recommending something in the range of 2 to 3.5 sq. meters. You
may think that you get more for your money with a larger kite, but it
does not work out that way. Sure, you get more fabric, but you also get
a kite with a very small useable wind range meant either for light airs
or for extreme use in the hands of an experiance pilot. Such kites are
actually difficult to fly in very light winds that you might think were
“safe”, and in even moderate winds they can be quite dangerous or even
lethal.
The other reservation you might have about a smaller kite is the fear that you will quickly become bored with it. This is not really so, because after you become more comfortable with it, you will fly it in higher winds and soon, it will become your “high wind kite” in a bag with several kites for varying conditions. The thrills you experience with your first kite will be limited only by your ability to push yourself while feeling safe and in control. This is why you get so much bang for your buck with a reasonable, small to mid-sized kite.
If you are still not sure about kite size, read posts in the on-line kite forums or talk with local club fliers and you will hear stories of those who bought too big to start, got badly beat up and then chucked or sold the kite, never to fly again. Just look on-line at eBay and other sites for used kites and notice how many of them are large foils. Also take note that the kites we will be recommending do not come up for sale on the used market all that often, but when they do, they are snapped up quickly.
No Jumping Today
The next truth you need to face is about
kite jumping. You may have seen pictures or videos on-line or you’ve
seen someone at the park or beach soaring off the ground, swinging on
their lines like a kitesurfer on water, and swooping down for a
landing. Such sights may be why you are interested in the sport, and
that’s why we are putting this up front. The fact is, kite jumping is
one of those things in life that every power kiter knows is bad for
you, everyone will agree in public that it is dangerous and you
shouldn't do it, but then they all do it anyway. Keep watching kite
jumping vids on YouTube and you will notice that they do not all end
nicely.
The conundrum faced by novice kite fliers and would-be jumpers is that no kite that is safe for a beginner is going to be effective for jumping, and no kite that can loft you and possibly set you down softly should ever be in the hands of a novice. Traction kites are not parachutes, paragliders or hang gliders and should not be used for intentional human flight. That being said, any kite can lift you off the ground in a gust and some foils over about 5 sq. meters can, under certain circumstances, mimic the “floaty” effect of a parachute and allow a relatively soft landing if flown with skill. You have to learn a maneuver called a "re-direct" in order to maintain some float. We have however already established that such a large foil is unwise for a first timer for very practical reasons, so let’s just forget about jumping for the first kite. If you really want to try jumping, learn to fly with a smaller foil first, then trade up to something 5 square meters or more, depending on your size.
Expanding kite bags
You have probably noticed that we have
made several inferences to kite bags with more than one kite in them.
No matter what you think your budget is, if you get hooked by this
sport, you will by hook or by crook end up with more than one kite in
your bag, possibly three or more. Just as a sailor heads to sea with a
variety of sails to cope with anything from a light wind zephyr to a
howling gale, your kite bag will expand to include kites to keep you in
the air comfortably in just about any kind of wind from 5 to 25 mph or
more. You can never change the speed of the wind, but you can always
change the size of your kite!
Sizing things up
Before we talk about specific kites we should explain how they are
sized and how their dimensional characteristics are described.
For four-line kites, the most
commonly referred to dimension is its square area, always expressed in
meters. The area is arrived at by multiplying the wingspan times the
chord, or front to back length of the kite while flat on the ground.
Since most kites are elliptical in shape and the chord changes,
narrowing towards the tip, the average chord length should be used for
accurate measurement. Some manufactures list the projected area as
well, which is the area you would measure when the kite is inflated and
has assumed its curved shape. The projected area then is going to be
less than the flat area, depending on how acute the curve of the canopy
is. It is not as much of a difference on our average fixed bridle foil,
but it’s a big deal on large “C” kites where the projected area can be
half the flat area.
It should be noted that some two and three-line kites, specifically the Symphony, Rush and Hydra series from HQ, list their kite sizes by wingspan . Their little “1.2 meter” kite, for example is really 0.66 square meters in area and their larger “2.7 meter” comes in at about 2 square meters.
The square area of a kite will tell you a lot about how much raw power it can develop and, to a certain extent, its speed. At the risk of over generalizing, we can lump fixed bridle foils into a few size categories...
The next important dimensional characteristic is aspect ratio, or “A/R”. The A/R of a kite helps describe its shape and span wise profile and is arrived at by taking the square of the wingspan and dividing that by the area, or more simply, dividing its wingspan by the average chord. (see figure 2) Once again we have to generalize, but we can lump different A/R ranges into the following categories with their respective characteristics:
 |
| Figure 2. Planforms of two kites with different aspect ratios ("A/R"). The low A/R kite on the left will more likely be stable and better able to absorb gusts. The hight A/R kite on the right will power-up faster and go upwind better but be more of a handful. |
Most popular recreational kite designs suitable for novices are a compromise of the extremes and have a medium A/R. Generally as the A/R goes higher, so does the power and the required skill level of the pilot. Here are some popular examples...
Features Explained
While shopping around for a kite, you’ll
hear a lot of terms thrown about to describe features and construction
details. Different features can affect the cost of a kite and its
performance, so it’s a good idea to review and describe some common
ones.
 |
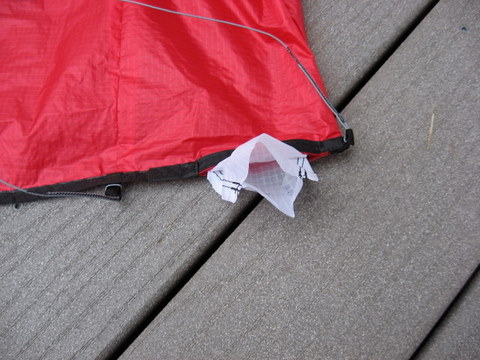 |
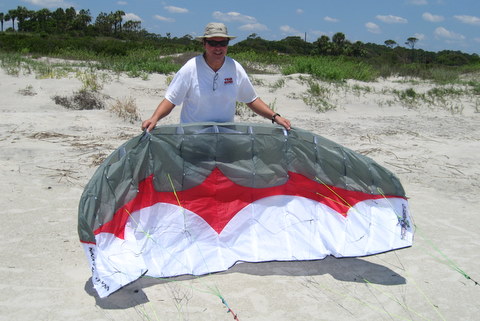
| Figure 3a. Here we see an example of both mesh-covered leading edge vents and diagonal ribs (white, inside the kite) that support the shape of the cell between bridle points. | Figure 3b. Here is an openned up dirt-out on a Flexifoil Rage to allow the removal of sand and debris. When closed, the white tube collar is tucked inside the kite and the seam is held shut with Velcro. You can also see examples of sewn bridle loops on either side of the dirt-out |
 |
 |
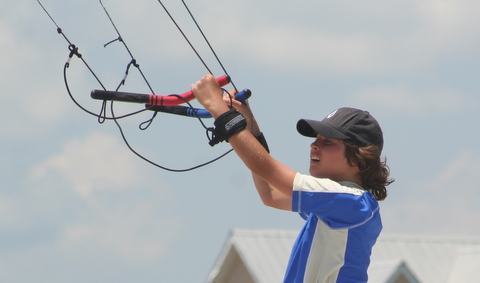
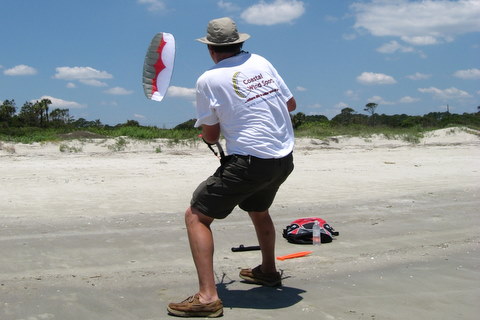
| Figure 3c. HQ Team Rider Wexler Muse flying his dad's Beamer III and sporting kite killers. Photo by Bobby "BeamerBob" Muse. | Figure 3d. Example of sewn loop (top) and knotted loop with a couple of overhand knots (bottom). Sewn loops are more common these days. |
Getting down to it- two or four lines? (Now, even three!)
The first decision to make is to decide if your want a two or four-line
kite. Two-line kites are flown on the end of a left and right main or
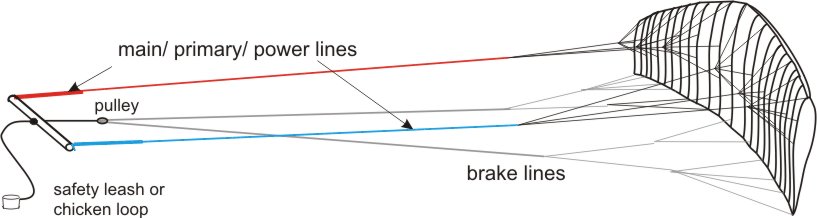
power line, connected to bridles at the front of the kite. Four-line
kites add a left and right brake line connected to bridles coming off
the trailing edge of the kite. ( See figure 4.) Four-line kites are
more versatile and more controllable, but there are several good
reasons to consider a two-line kite for your first purchase.
Two-line kites are generally less expensive for a couple of reasons. First, they tend to be made in the smaller sizes suitable for children (eight and up) and teens, and up to about three meters for adults. Second, the advanced fibers used for power kite lines in anything but the smallest foils are expensive, so providing only two lines saves some money, too.
Two-line kites are easier to set up and arguably simpler to fly since you are not dealing with the brake lines of a four-line kite. Pull left to turn the kite left and right to go right, and slacken or push the opposite line for an even faster turn. Because they are small, they fly relatively fast and can be a lot of fun. They also have a huge wind range since they generally can be flown safely in higher winds.
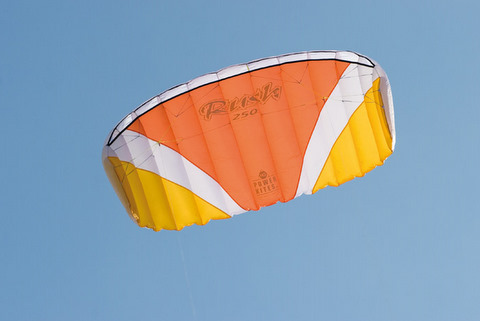
A little 1.2 meter Symphony from HQ (Germany) starts at just over $48 and is safe for a six or eight year old (with supervision). The Symphony series goes up to 2.2 meter (span) for about $105 which is suitable for older teens and adults. They will start to fly at about six to eight mph with the upper end limited by the pilot’s weight, strength and ability to safely maintain control. Anything over about 2.0 meters is strong enough to pull a buggy or a land board in a good breeze.
Added to the Symphony Series for 2009 are two new kites, the Symphony "Speed" 2.0 and 2.5 for about $134 and $152 respectively. These kites have a refined, more agressive planform and will fly faster and develop more pull than the standard Symphony kites of similar size.
 |
 |
| Figure 4a. The Symphonies are colurful, fun 2-line foils. | Figure 4b. The Symphony Speed comes in 2.0 and 2.5 m (span) and sports a more agressive foil and higher aspect ratio. |
Also from HQ is the Rush III series of two-line trainers equipped with control bars. A control bar allows you to free up a hand for short periods and makes a great trainer for those who plan to move on to kiteboarding. The Rush III comes in three sizes from 2.0 m span to 3.0 m and are priced from about $124 to $180. Two line kites are often difficult to realunch from a crash with out help or re-setting the kite youself, but the Rush III bridles are designed to allow you to tease the kite around and relaunch from just about any postion without assistance.
New to the Rush seiries for 2009 is the Rush III Pro, a novel three line hybrid. The third line connects to a brake bridle on the trailing edge and allows for reverse take-offs if the kite ends up nose down on the ground. The third line also allows for a safety strap to be connected to it that straps to your wrist. If you get into trouble with the kite, you can drop the bar and release the kite to the safety, whereapon the kite dumps on the brake bridle and stalls, loosing all power and falling to the ground. The Pro models go for about $180 to about $250 in sizes from 2.5m span to 3.5 m.
 |
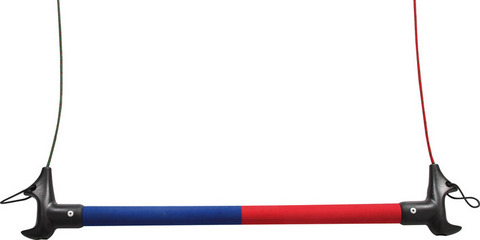 |
| Figure 5a.HQ Rush 2-line kite. The sail shape and bridle configuration let you tease it off the ground from most any crash position. | Figure 5b. The Rush 2-line control bar. Not pictured is the safety leash that attaches your wrist and one of the lines. |
 |
 |
| Figure 5c. HQ Rush Pro 3-line kite. The third center line runs from the brake bridle on the traling edge of the kite through the cnter of the bar toa safety leash. The third line allows easy reverse launches if you crash on the nose. | Figure 5d. The Rush Pro 3-line control bar. The safety leash attaches your wrist and runs to the brake line and brake bridle. Let go of the bar and the kite flags harmlessly on the brake lines. |
The HQ Hydra is another new 3-line kite that is actaully a closed cell inflatable foil. Take look at figure 6A and note the oval air inlets in the leading edge. They have mesh accross them and a nylon flap behind, creating a one way valve to keep air in. The kite will pre-inflate a bit on the ground just from the breeze, then finish inflating after launch from the ram-air effect in flight. The Hydra is great to play with in water since it will float and can be water re-launched. It's very popular with kitebaording schools as a trainer and is a great all around recreational kite to play with in the surf on a hot summer day. They are available in 3 meter and 3.5 meter (span) sizes for about $270 or $330, respectively.
 |
 |
| Figure 6a.HQ Hydra closed-cell inflatable. One way flapper valves behind the leading edge air intakes keeps air in, keeping the kite inflated. A zipper on the back lets air out for pack-up. | Figure 6b. The Hydra will float on the water, making it a great kitesurf trainer. Here, it's on its nose after a crash, but can easily be relaunched. Since it's upside down, pulling on the center rear brake line will acutally launch it backwards off the water, where it can be steered around and flown out. |
Flexifoil (England) makes the Buzz (1.4 meters and $84) and the Big Buzz (2.05 meters and $110). They also still make the venerable Stacker, Proteam and Super 10’s going for $135 and up. These are older designs but still popular. A modern 2-line kite is the Sting, which comes with a control bar. The Stings can be flown in very high winds with care. They start at $160.00 and are also available with four lines on handles.
Another nice thing about two-line kites is that they are small enough to toss in a travel bag for vacation. On a foreign beach or field they are great conversation starters and in light to moderate winds are generally safe to hand to a stranger.
The Case for Four Lines
When you add brake lines and get a
four-line kite, you add a whole new dimension in performance and
maneuverability to the kite. A four line kite can do everything a
two-line kite can do plus…
Four line kites are not much harder to fly. With many kites, you can fly it by the main lines and forget the brake lines are even there until you are ready to start experimenting with them. See figure 7 for a schematic of a four-line set-up with handles.
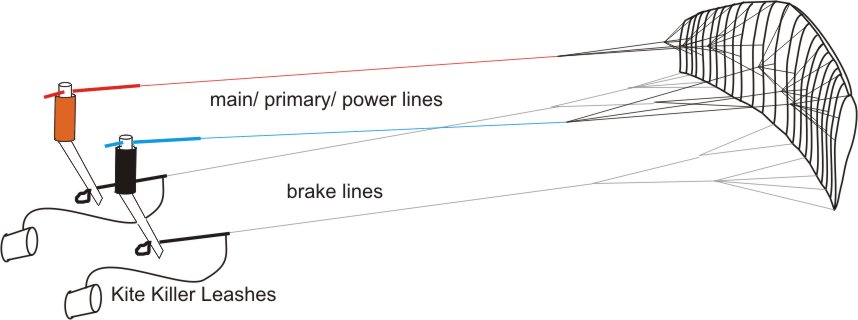 |
| Figure 7. Diagram of a kite with 4-lines and quad handles. Main lines go to the top of the handles and the brake lines connect to the bottoms, as do the optional kite killer safety leashes. |
Four-Line Choices
Probably about the single most often recommended 4-line foil for
beginners is the Beamer from HQ. It has been around for years and the
latest iteration is the Beamer IV
They are stable and predictable, which makes them easy to fly and yet
they perform surprisingly well. They come complete with handles, lines,
kite killers, a ground stake (used for parking the kite on the ground),
and even a video CD (more for entertainment than instruction). At about
$265 for a 3.0 square meter (an ideal size to start with) they are a
good value.
 |
 |
| Figure 8a.HQ Beamer IV 3.0m takes a pass through the center of the wind window. with a higher aspect ratio of 3.5, it's great in light air. | Figure 8b. The Beamer IV parked and waits patiently to fly. With the handles staked in the ground by the brake loops the kite will sit still like this all day until given the nod to fly. Note the multi-colored bridle segments that make things easier to sort out. |
Another excellent kite for the beginner is the Hornet from Peter Lynn (now managed from Holland). It sports the same easy flying characteristics as the Beamer and also comes complete with knapsack, handles, lines, kite killers and ground stake. With an aspect ratio of 3.0, it will excel in gusty wind and power up smoother that kites with a higher A/R at the cost of some light wind performance. The 3,0 sq. meter size goes for about $239.
 |
 |
| Figure 9a.The Peter Lynn Hornet 3.0m takes a pass through the center of the wind window. with a lower aspect ratio of 3.0, it's great in gusty and higher winds. | Figure 9b. The Hornet 3.0 meter being unfurled. The lines have been staked at the handles by the brake loops, so it won't take off while I set the sail. |
We have recently added the Buster Soulfly by PKD Kites to our mix of recommended kites for the first-timer. The "Soulfly" part of the name refers to line of dazzling "tribal" graphics in the kites design. PKD takes a unique approach to putting together a high performance entry-level kite at an aggressively low price by doing away with features found on other kites. Gone is the fancy backpack in lieu of a simple nylon sack with zipper closure and simple straps. The lines sets are all high visiblility yellow and only the knotted (not sewn) end-loops are color coded. But all the other features and design elements that make the Buster a great kite to fly are there, along with great workmanship in the construction. Definately worth a look. See figure 10.
 |
 |
| Figure 10a. The Buster Soulfly 3.3 meter by PKD Kites. Moderate A/R and swept wings ending in pointed tips make it stable but a good performer. Graphics are pretty cool, too. Photo by PKD | Figure 10b. Here is the whole line-up of the Buster Soulflys, from 1.5 to 4.4 sq. meters. Photo by PKD |
Flexifoil’s entry level kite is the Sting, available in sizes up to 3.3 sq meters which runs for about $265. Those familiar with the Flexifoil brand will appreciate the quality and value. Flexifoil is the only manufacturer that, along with a regular warranty, includes a free repair card with every kite that is good for 30 days and will cover you no matter what you do to the kite. The Stings are easy to fly in gentle winds and built to fly in very high winds for those experienced pilots who like to fly when others should be afraid.
For those who want to start right out of the box with a high performance kite that is faster and goes upwind better than a typical entry level kite, yet is still manageable for a novice, consider the Rage from Flexifoil or the Viper from Peter Lynn. These kites are designed to produce their power by flying fast through the window rather than lifting directly overhead, and this makes them great buggy engines. Another new choice just out in 2008 is the Fexifoil Blurr; it's even faster than the Rage yet still tamer than a full-blown race kite. Because they are stable and easy to fly, we can still recommend these to beginners who plan on learning to drive a kite buggy.
Starting on a Bar
For those who are planning on learning how
to kiteboard on the water, it makes sense to start out with kite on a
control bar, rather than handles since the bar is more similar to a
kiteboard rig . Learning to kiteboard safely requires professional
instruction and most instructors will recommend that their students
start out with 2.0-4.0 meter kite on a bar. The New Scout from HQ is a
good choice. The Scout replaces the popular Beamer TSR with a whole new
design, including a new "cross-over bar" which has the effect of
amplifying brake input in turns for greater performance and
maneuverability, including tighter and faster turns. For 2010, the Scout II
will revert to the regular control bar, and put the cross-over rig up in the
kite bridle. They also come
with everything you'll need, including an instructional video CD. See
figure 12.
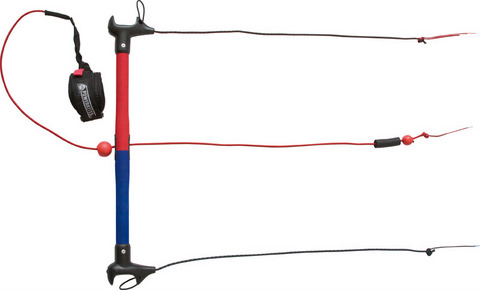
When a kite is rigged with a control bar, the front lines are attached to the ends of the bar and the brake lines connect to the center, usually through a pulley. Pulling on one end of the bar to turn the kite changes the geometry of the triangles formed by the lines and the bar and causes the brake line to be pulled in the direction of the turn. The added tension on the brake makes the kite turn sharper, similar to the way it would on handles when an individual brake is applied. See figure 11 for schematic of a kite on a control bar.
 |
| Figure 11. Diagram of a kite with 4-lines and a control bar. Main lines go to the tips of the bar and the brake lines run through a pulley in the center. The kite killer safety leash connects to the center brake lead through a hole in the bar. Letting go of the bar pulls the brake lines through the bar, flipping the kite on its back and killing all power. |
Using a control bar lets you free up a hand while you are flying. Bars are popular with land boarders for this reason as it lets the rider do hand grabs on the ‘board and other tricks. I’ve even added a cup holder to my kite buggy and flying with a bar lets me take a sip from a water bottle while cruising down the beach. While a bar does offer the convenience of a free hand from time to time, it does give up the finesse you are able to apply with the individual brakes on handles, especially important in light air. Many kites can fly on either a bar or handles, and switching back and forth takes only a few minutes.
Some control bars have harness loops, also called "D loops" at the center of the bar that can be slipped over the hook of a kite harness. It's a great way to take the strain off your arms, but "hooking in" is recommended only for experienced pilots, since the safety release is not as instant and intuitive as simply letting go of the handles or bar. See figure 12b.
 |
 |
| Figure 12a. Here is the original Scout from HQ in the 4.0 sq. meter size. HQ has come out with the Scout II where they moved the cross-over rig -used to improve steering with a bar - from the control bar up into the bridle of the kite. | Figure 12b. Toby is flying his new Scout, hooked into a harness with the included harness strap. The cross-over rig and with pullies can be seen above the control bar. |
One thing that confuses a lot of beginners and is important to understand about a control bar is that it is not the same as a “de-power” bar used on some larger kites. De-power bars are used on kiteboarding rigs and some advanced land kites and require the use of a harness. With this set-up, the front lines are run through a hole in the center of the bar and connect to the harness hook. The brake or rear lines are connected to the ends of the bar. Moving the bar in and out changes the angle of attack of the entire kite and thus the power output. This is why de-power kites are not "fixed-bridle" as we have been describing thus far. Their bridles have one or more pullies near each of the attachment points that allow the entire bridle to move and pivot the kite. This is an advanced kind of power kiting not recommended for novices.
Luckily for the consumer, the technology of power kiting is mature, and most of the manufacturers in the field are well established and reputable. For this reason, it’s hard to buy a “bad” kite unless you simply buy the wrong kite for your application. All the kites discussed here come with just about everything you need except for wind. If you do end up with a kite without lines or gear, have a kite shop help you (or call us) to choose the right accessories so you can fly safely and with maximum enjoyment.
One mistake we see a lot of are first-timers picking up a “bargain” on Ebay or some other such forum only to find out that it is an older model inflatable de-power kite intended for kiteboarders. Kiteboarding gear has evolved a lot in just a few years so any kite even a few years old should be suspect unless you really understand what you are getting. Because of rapid advances in design, a lot of older models are being dumped on the used markets for low prices that tempt uninformed wannabe power kiters. In any event, these are not suitable for beginners. The amount of power needed to pluck a rider out of the water is huge (as anyone who has water-skied will know), so these kites are very powerful and dangerous in the hands of a novice without professional instruction.
Once you’re all set with your new kite, all you have to do is fly! For your first time out, check out our article “Traction Kiting 101- Your First Time Out with a Four-Line Kite”. Even if you start with a two-line kite, it will give you some good tips to get you going. If you want to move on to other kite sports, such as a buggy, land board or kiteboarding on the water, make sure you are proficient with your first kite. You should be able to fly it in a variety of conditions and, just as important, know when not to fly it.
I hope this gives you a good start. Get a kite, get out there and don't look back. If you get bit by the power kiting bug, you will sooner or later end up with more kites in your bag. Still, you’ll always have a soft spot in your heart for that first kite that got you hooked.
Last edit date: 10/18/2010
Copyright 2007, 2008, 2009, 2010 Coastal Wind Sports, Inc.